이 예제는 플레이어 관리에 관한 코드를 모아놓는 PlayerManager 모듈 스크립트를 생성하고 이용하는 법을 설명하는 예제이다. 이를 통해 코드들을 어떤식으로 모듈화할 것인지 감을 잡을 수 있다. Managing Players는 총 3편으로 구성되며, 1편은 플레이어들을 로비로 이동시키는 방법, 2편은 플레이어들을 경기장으로 이동시키는 방법, 3편은 플레이어들에게 무기를 주는 방법을 다룰 예정이다.
아래의 코드 블록은 [3]시리즈를 모두 따라해보고 난 후의 코드들이다.
로블록스 스튜디오에 코드를 받아 놓은 후 글을 읽으며 따라가면 도움이 되리라 생각된다.
ServerScriptManager > GameManager 스크립트
-- Services
-- 탐색창에 있는 것들을 Service라 부름
local ServerStorage = game:GetService("ServerStorage")
-- ServerStorage 서비스 가져옴
local Players = game:GetService("Players")
-- Player 서비스 가져옴
-- Module Scripts
local moduleScripts = ServerStorage:WaitForChild("ModuleScripts")
-- ServerStorage 서비스 안에 있는 ModuleScripts 폴더 가져옴
local matchManager = require(moduleScripts:WaitForChild("MatchManager"))
-- moduleScripts 안에 있는 MatchManager 스크립트 가져옴
local gameSettings = require(moduleScripts:WaitForChild("GameSettings"))
-- moduleScripts 안에 있는 GameSettings 스크립트 가져옴
-- while 문 : 최소 인원이 가득 찰때까지 intermission 시간을 갖는다.
while true do
-- repeat : intermissionDuration 시간만큼 기다리기를 반복한다.
-- until : Player의 숫자가 최소 인원보다 같거나 클때까 지
-- 최소인원이 가득한다면, transitionTime을 가진 후 prepareGame()함수 실행한다.
repeat
wait(gameSettings.intermissionDuration)
print("Restarting intermission")
until Players.NumPlayers >= gameSettings.minimumPlayers
print("Intermission over")
wait(gameSettings.transitionTime)
matchManager.prepareGame()
endServerStorage > ModuleScripts > PlayerManager 스크립트
-- 테이블 선언
local PlayerManager = {}

-- Services
-- Player : 게임에 참여하거나 떠난 플레이어를 알 수 있다.
local Players = game:GetService("Players")
-- ServerStorage안에 플레이어 Weapon 만들어 놓기!
local ServerStorage = game:GetService("ServerStorage")

-- Map Variables
-- Map 변수들은 플레이어를 다른 장소로 텔레포트 시킬 때 사용된다.
local lobbySpawn = workspace.Lobby.StartSpawn
local arenaMap = workspace.Arena
local spawnLocations = arenaMap.SpawnLocations

-- Player Variable
-- 현재 게임 중인 플레이어들을 추적하는 테이블 : 배열로 활용한다.
local activePlayers = {}
-- ServerStorage 안에 있는 Weapon을 platerWeapon변수에 할당해준다.
local playerWeapon = ServerStorage.Weapon

-- Local Functions
-- 플레이어가 게임에 입장했을때, 로비 스폰 지점에서 게임 시작!
local function onPlayerJoin(player)
	print("player : ",player," 님이 입장하셨습니다.")
	player.RespawnLocation = lobbySpawn
	print("player : ",player," 님이 로비 : ",player.RespawnLocation," 입장하셨습니다.")
end

-- player : 게임 플레이어 / whichSpawn : Arena 경기장에 spawn 하는 SpawnLocation
local function preparePlayer(player, whichSpawn)
	print("PlayerManager 모듈의 preparePlay 함수 실행!")
	print("player:",player,"whichSpawn: ",whichSpawn)
	-- 플레이어의 리스폰 지역을 whichSpawn으로 설정한다.
	player.RespawnLocation = whichSpawn
	-- LoadCharacter() 함수를 통해 새로운 캐릭터를 만든다.
	player:LoadCharacter()

	-- 플레이어의 캐릭터를 받아온다.
	local character = player.Character or player.CharacterAdded:Wait()
	-- Give the player a tool
	-- sword의 객체 복사본 변수 sword선언
	local sword = playerWeapon:Clone()
	-- sword의 주인을 플레이어의 캐릭터로 설정해준다.
	sword.Parent = character
end

-- Module Functions

function PlayerManager.sendPlayersToMatch()
	print("Sending players to match")
	-- Workspace의 arenaMap폴더에 SpawnLocations의 객체들을 가져온다.
	local arenaSpawns = spawnLocations:GetChildren()
	-- for문을 이용하여 Areana 경기장의 spawnLocation로 보내준다. (spawnLocation은 여러개이며, 플레이어들을 랜덤으로 보내준다.)
	-- for문 해석 : playerKey 부터 whichPlayer 까지 pairs() 순회 함수를 통해 activePlayer 배열에 whichPlayer를 넣어준다.
	-- activePlayer 배열은 Areana 경기장 안에 있는 플레이어를 나타낸다.
	for playerKey, whichPlayer in pairs(Players:GetPlayers()) do
		print("activePlayers 배열에 들어간 플레이어 :",whichPlayer)
		table.insert(activePlayers,whichPlayer)
		print("activePlayers [ ",playerKey," ] 배열에 들어간 플레이어 확인 : ",activePlayers[playerKey])

		-- Gets a spawn location and then removes it from the table so the next player gets the next spawn
		-- arenaSpawns 배열의 1번에 있는 spawnLocation을 가져온다.
		local spawnLocation = arenaSpawns[1]
		print("플레이어가 부활할 arenaSpawns : ",spawnLocation)
		-- 다음 플레이어가 Areana안에 있는 다른 곳의 SpawnLocation으로 이동하기 위해 제거해준다.
		print("arenaSpawns[1] 배열 확인 : ",arenaSpawns[1],"이후 제거 작업 들어감")
		table.remove(arenaSpawns, 1)
		print("arenaSpawns[1] 배열 제거 확인 : ",arenaSpawns[1])
		-- 입장한 플레이어를 Areana안에 있는 spawnLocation으로 이동시켜준다.
		preparePlayer(whichPlayer, spawnLocation)
	end
end

-- Events
-- 플레이어가 게임에 들어올떄마다 실행되는 이벤트.
-- 플레이어가 게임에 접속하면, onPlayerJoin 함수가 실행된다.
game.Players.PlayerAdded:Connect(onPlayerJoin)

return PlayerManager
ServerStorage > ModuleScripts > GameSettins 스크립트
local GameSettings = {} -- module script 선언

-- Game Variables
GameSettings.intermissionDuration = 5
-- GameSettings이라는 module script안에 intermissionDuration이라는 변수 선언
-- 아래의 변수 선언은 위와 같다.
GameSettings.matchDuration = 10
GameSettings.minimumPlayers = 2
GameSettings.transitionTime = 5

return GameSettings
ServerStorage > ModuleScripts > MatchManager 스크립트
local MatchManager = {} -- module script 선언

-- Services
local ServerStorage = game:GetService("ServerStorage")

-- Module Scripts
local moduleScripts = ServerStorage:WaitForChild("ModuleScripts")
local playerManager = require(moduleScripts:WaitForChild("PlayerManager"))


-- MatchManager라는 module script안에 prepareGame()함수 선언
function MatchManager.prepareGame()
	print("Game starting!")
	--PlayerManager 모듈의 sendPlayersToMatch 함수를 넣는다.
	--GameManager 스크립트에서 MatchManager.prepareGame 함수를 실행시키면 sendPlayerToMatch() 함수가 실행된다.
	playerManager.sendPlayersToMatch()
end -- prepareGame()함수 종료

return MatchManager -- MatchManager라는 module script를 종료
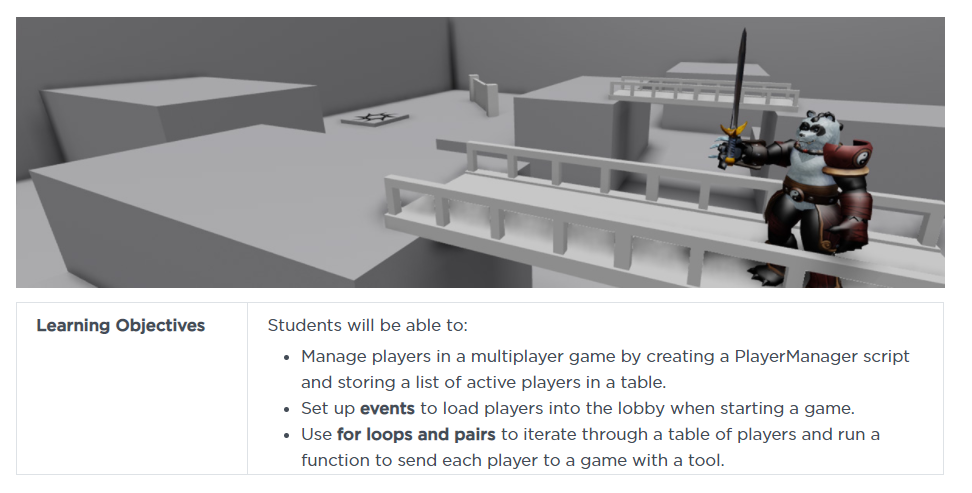
이번 글은 플레이어를 관리하는 방법에 대한 글이다. 위와 같은 내용들을 배울 수 있다.
The Player Manager Script (Player Manager 스크립트)
플레이어를 매치지역으로 보내고, 활성 유저를 추적하는 등의 일들을 처리하기 위한 코드가 필요하다. 이러한 일들을 처리할 PlayerManager라는 이름의 module script를 만들어보자.
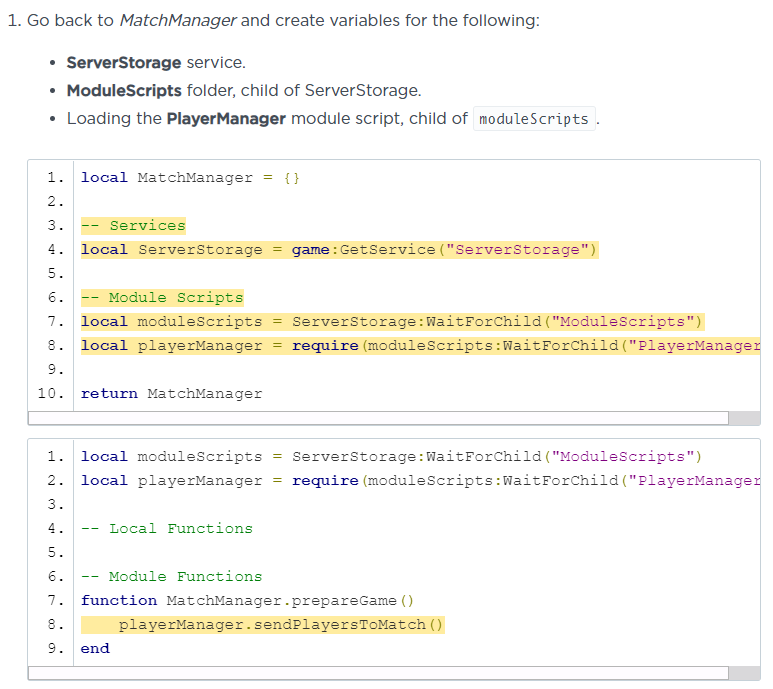
Set Up the Manager (Manager 셋업하기)
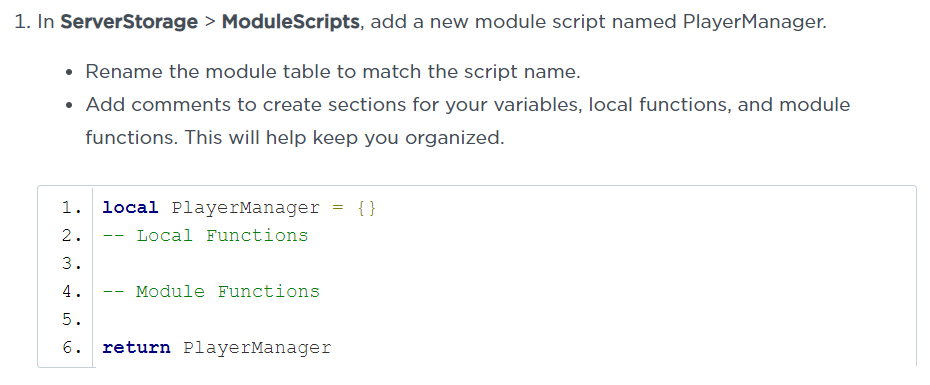
PlayerManager라는 이름을 가진 모듈 스크립트를 생성 후, 테이블 이름을 PlayerManager로 바꿔준다.
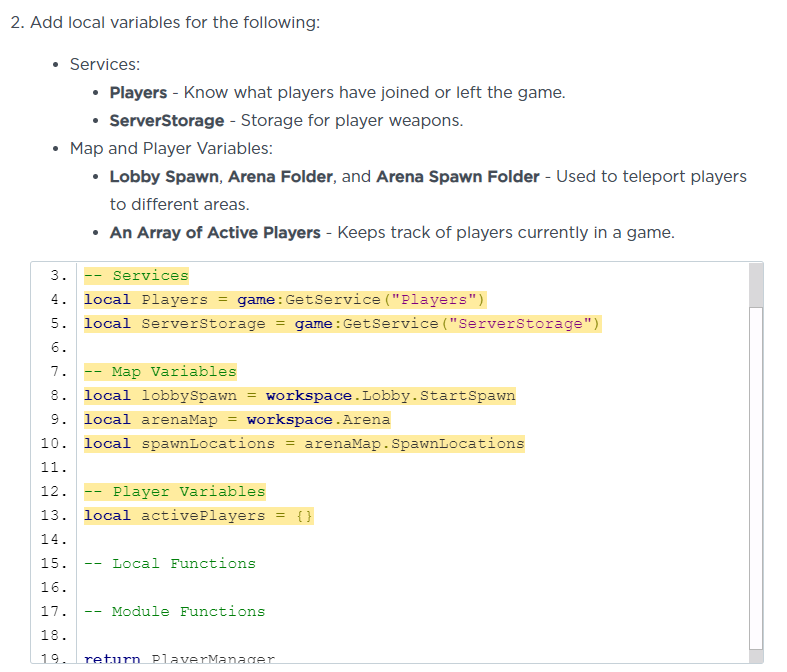
모듈 스크립트 안에 필요한 변수들을 선언한다.
변수에 대한 설명은 아래 코드블럭에 주석으로 달아놨다.
local PlayerManager = {}

-- Services
-- 플레이어가 나가고 들어오는 것을 알 수 있도록 해주는 변수
local Players = game:GetService("Players")
-- 플레이어의 무기를 저장하는 저장소
local ServerStorage = game:GetService("ServerStorage")

-- Map Variables
-- Map 변수들은 플레이어를 다른 장소로 텔레포트 시킬 때 사용된다.
local lobbySpawn = workspace.Lobby.StartSpawn
local arenaMap = workspace.Arena
local spawnLocations = arenaMap.SpawnLocations

-- Player Variables
-- 현재 게임중인 플레이어들을 추적하는 변수
local activePlayers = {}

-- Local Functions

-- Module Functions
function PlayerManager.sendPlayersToMatch()
	print("Sending players to match")
end

return PlayerManager
Spawn Players in the Lobby (플레이어를 로비로 소환하기)

플레이어들을 로비로 Spawn되게 하는 방법에 대해 설명한다.
아래 내용에 플레이어들을 로비로 Spawn 시키는 자세한 방법이 나온다.
원래 Spawn 지점이 여러 개면 랜덤으로 Spawn 되는것 같은데 확인이 필요할 것 같다. -> 확인결과 Spawn지점이 여러 개일 경우 따로 지정해주지 않으면 랜덤으로 Spawn됨!
(CheckPoint에 따라 Spawn지점 설정하는 글 링크)

player 파라미터를 가진 onPlayerJoin함수를 생성한다. 생성한 함수 안에, player의 RespawnLocation 속성을 위에서 선언해둔 lobbySpawn 변수로 설정해준다. 아래 코드블럭을 참고하자.
-- Local Functions
-- 플레이어가 게임에 입장했을 때, 플레이어의 RespawnLocation 속성을 로비로 설정해주는 함수
local function onPlayerJoin(player)
	player.RespawnLocation = lobbySpawn
end

-- Module Functions
function PlayerManager.sendPlayersToMatch()
	print("Sending players to match")
end

return PlayerManager
onPlayerJoin() 함수를 PlayerAdded 이벤트에 연결시켜준다. 이를 통해, 유저가 들어올때마다 onPlayerJoin() 함수가 실행된다.
-- Module Functions
function PlayerManager.sendPlayersToMatch()
	print("Sending players to match")
end

-- Events
-- 플레이어가 들어올때마다 실행되는 이벤트. 플레이어가 접속하면 onPlayerJoin 함수가 실행된다.
Players.PlayerAdded:Connect(onPlayerJoin)

return PlayerManager
PlayerManager는 모듈 스크립트이기 때문에 위의 코드를 실행한다 하더라도 아무런 일이 발생하지 않는다. 밑의 내용에서 PlayerManager을 어떤식으로 사용하는지에 대한 설명이 나와있다.
Connect Modules and Test (모듈 연결하고 테스트하기)

MatchManager 모듈에서 PlayerManager 모듈을 어떤식으로 사용하는지 설명한다.
MatchManager 모듈안에 위에 노란색 처리되어 있는 부분을 추가해준다. 주석은 아래 코드 블럭에 달아 놓았다.
local MatchManager = {}

-- Services
local ServerStorage = game:GetService("ServerStorage")

-- Module Scripts
-- PlayerManager 모듈 스크립트를 불러온다(require)
local moduleScripts = ServerStorage:WaitForChild("ModuleScripts")
local playerManager = require(moduleScripts:WaitForChild("PlayerManager"))

return MatchManager
local moduleScripts = ServerStorage:WaitForChild("ModuleScripts")
local playerManager = require(moduleScripts:WaitForChild("PlayerManager"))
-- Local Functions
-- Module Functions
-- PlayerManager 모듈의 sendPlayersToMatch 함수를 넣는다.
-- GameManager 스크립트에서 prepareGame 함수를 실행시키면 sendPlayersToMatch 함수가 실행된다.
function MatchManager.prepareGame()
playerManager.sendPlayersToMatch()
end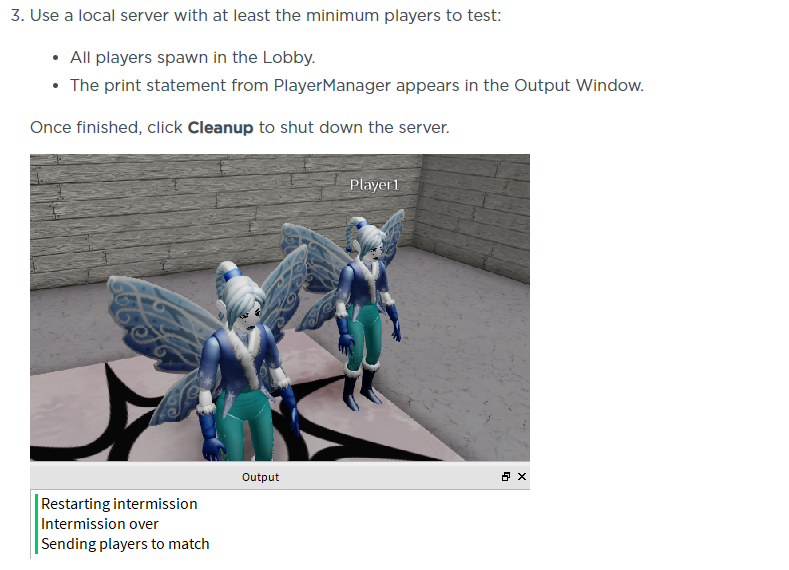
이제 테스트를 진행한다. 테스트는 최소 2명 이상의 플레이어로 실행해야 한다.
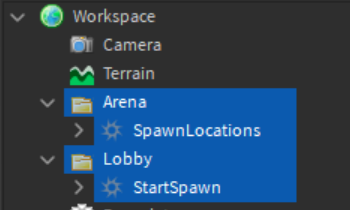
근데 제공되는 템플릿 없이 코드만 따라한 경우 Spawn 지점을 따로 생성해주지 않았기 때문에 에러가 난다. 따라서 아래의 이미지와 같이 Spawn 지점을 생성해주고 테스트해보도록 하자.
MatchManager든 PlayerManager든 둘 다 모듈 스크립트이기 때문에 독립적으로 코드가 실행되지 않는다. 결국 모듈 스크립트에 있는 코드들은 모두 ServerScriptService 안에 있는 GameManager(스크립트)에서 실행된다. 이전의 예제를 잘 따라했다면 이해할 수 있음
참고 링크
education.roblox.com/en-us/resources/battle-royale/managing-players
플레이어 관리
이 플랫폼은 사용자 경험을 개선하고, 콘텐츠를 맞춤 설정하고, 소셜 미디어 기능을 제공하고, 트래픽을 분석하기 위해 쿠키를 사용합니다. 이 플랫폼의 쿠키 사용을 중지 또는 관리하는 방법
education.roblox.com
'Education_Tutorial Series > Coding Project: Battle Royale' 카테고리의 다른 글
| Coding Project: Battle Royale - [4] Timers and Custom Events (타이머와 커스텀 이벤트) (0) | 2021.04.19 |
|---|---|
| Coding Project: Battle Royale - [3-3] Managing Players (플레이어 관리) (0) | 2021.04.19 |
| Coding Project: Battle Royale - [3-2] Managing Players (플레이어 관리) (0) | 2021.04.19 |
| Coding Project: Battle Royale - [2] Coding the Game Loop (0) | 2021.04.18 |
| Coding Project: Battle Royale - [1] Project and Map Setup (0) | 2021.04.18 |


댓글